In this article, we see how to create a simple gallery in Xamarin Android.
To this end, a Xamarin Form design is utilized in Visual Studio 2019.
1. In Visual Studio, create a blank Xamarin blank Android, not Xamarin Form
2. Create a new class namely "ImageAdapter" that inherits from BaseAdapter
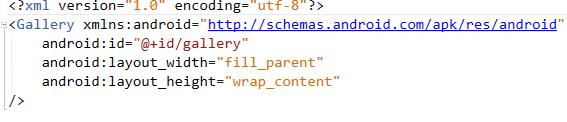
Open Resources/Layout/Main.axml and add following. Your .axml page should seem to be as follows:
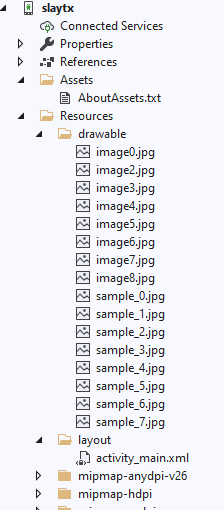
Add seven .jpg images to Resources/drwable folder as follows:
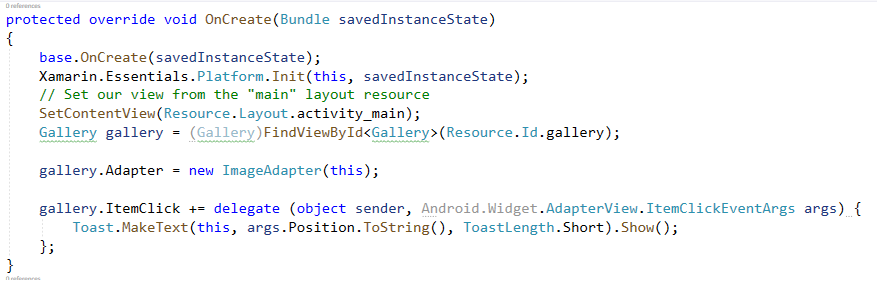
 Note that your ImageAdapter class should include following lines:
class ImageAdapter:BaseAdapter { Context context; public ImageAdapter(Context c) { context = c; } public override int Count { get { return thumbIds.Length; } } public override Java.Lang.Object GetItem(int position) { return null; } public override long GetItemId(int position) { return 0; } // create a new ImageView for each item referenced by the Adapter [Obsolete] public override View GetView(int position, View convertView, ViewGroup parent) { ImageView i = new ImageView(context); i.SetImageResource(thumbIds[position]); i.LayoutParameters = new Gallery.LayoutParams(2000, 1000); i.SetScaleType(ImageView.ScaleType.FitXy); i.SetLeftTopRightBottom(0, 500, 0, 0); return i; } // references to our images int[] thumbIds = { Resource.Drawable.image0, Resource.Drawable.image2, Resource.Drawable.image3, Resource.Drawable.image4, Resource.Drawable.image5, Resource.Drawable.image6, Resource.Drawable.image7 }; }
You will see following screen when the emulator runs.
##############################################